Storage items
Storage items in LDMS are represented as nested grids.
Each storage item contains rows and columns that represent individual locations within that storage item. For example, a shelf that can hold 10 boxes might have the dimensions of 2 x 5 (2 rows with 5 columns to represent each box). This is true of all storage items, from big storage units to small containers.
Figure: Storage items as grids. This visual illustrates the nested grid of storage items. Below each item is a grid showing where the highlighted item is positioned.

Rows and columns can be represented as either numbers or letters. Individual sections of a storage item can also be represented as a position number instead of coordinates. For example, if you have a 1 x 3 shelf, each position could be represented as 1, 2, and 3, rather than (1,1), (1,2), and (1,3).
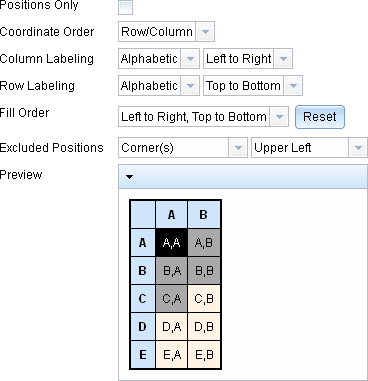
Storage items can optionally have an excluded position. An excluded position is useful for determining which side of the storage item is the front and which is the back. For example, if you know that the upper-right corner of a container will be empty, you know where to start inserting specimens.
Figure: Configuring a storage item layout. The preview shows how these settings will be interpreted by LDMS. A,A (black) is an excluded position. A,B to C,A (gray) contain another storage item or specimen. C,B to E,B (tan) are empty positions.
All of these properties of storage items can be configured when adding new items to the storage tree. They can also be defined in advance by using a storage template.