Using the Specimen Management page
The Specimen Management page shows all of the visits for a specific participant and protocol combination.
The main work area of the Specimen Management page will display the all the visits and associated specimens for a participant. Use the navigation buttons to change between different participants.
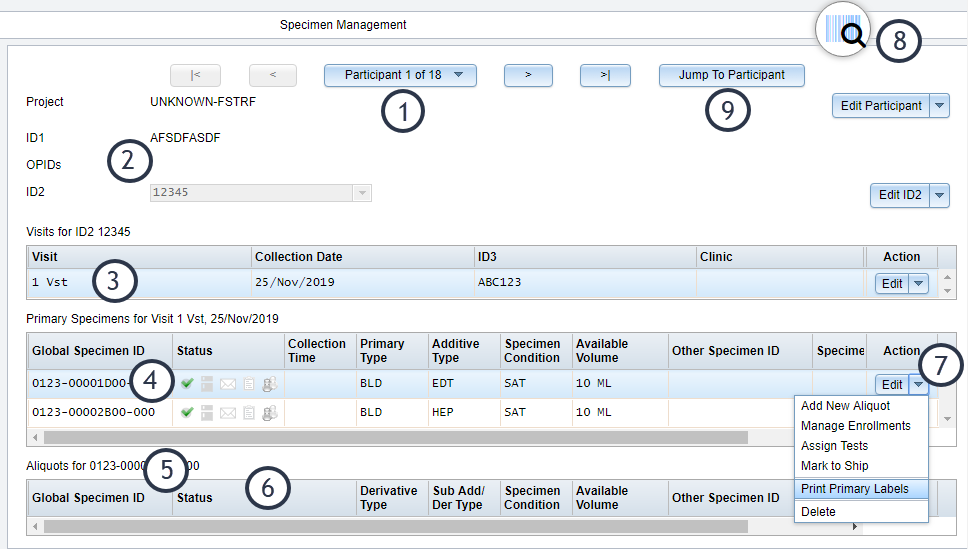
Figure: The Specimen Management page. (1) Navigate between participants, (2) The current participant enrollment information, (3) Visits for the current participant, (4) Primary specimens for the currently selected visit, (5) Aliquot specimens derived from the currently selected primary specimen, (6) Specimen status indicators, (7) Actions for a primary (8) Indicator that you can scan a barcode to search for a record, (9) Jump directly to a participant
| Status Icon | Meaning |
|---|---|
| Specimen is available | |
| Specimen is assigned a storage location | |
| Specimen has been marked to ship to another laboratory | |
| Specimen is on a pending shipment to another laboratory | |
| Specimen has been shipped to another laboratory | |
| Specimen has an additional enrollment | |
| Specimen has an additional enrollment |
| Objective | Action |
|---|---|
| Change participants | Click the navigation buttons at the top of the screen. |
| View the visits for a different study that the participant is enrolled in | Select the study from the Study drop-down box. If the Study box is disabled, then the participant is only enrolled in one study. |
| See the primary specimens associated with a visit | Click a visit from the Visits section of the page. |
| See the aliquots associated with a primary specimen | Click a primary in the Primary Specimens section. |
| Search for a specific participant | Use the filters on the left-side of the page. |