Adding participants using the Specimen Management page
A new participant can be created on the Specimen Management page
or the Quick Add page. This section explains how to add them on the
Specimen Management page.
About this task
A new participant can be created two ways:
If you want to create a new participant without any enrollments or visits, use the
Specimen Management page.
If you want to create a new participant allow with an associated visit and specimens,
use the Quick Add feature.
The Quick Add feature requires you to enter at least one visit date with the participant.
If the participant has not yet had a visit, you must use the Specimen Management page.
Procedure
From the LDMS menu bar, click Specimen
Management.
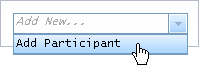
From the action menu in the top-left of the page, click Add
Participant.
Figure: The action menu with Add Participant selected
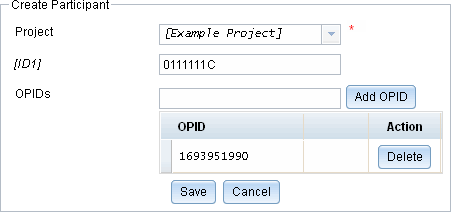
From the Project box, select a project.
Figure: The Create Participant page
The ID1 box will change to appropriate name for the
selected project.
In the ID1 box, enter the participant’s identifier.
The label for the ID1 box will vary by project. In the example
above, ID1 is “PID”.
Optional: In the OPIDs box, enter an other participant
identifier, and then click Add OPID.
More than one OPID can be added for the same participant. To remove an OPD that was added,
click the Delete button to the right of it.
Click Save.
If the project has validation checks for ID1, they will be run at this time. If the ID1
that you entered is not valid for the project, you will be prompted to correct it before
you can save the new participant.
If the project and participant identifier combination already exists, you will be asked if you want to view that participant instead.
Results
The new participant will be created and added to the end of your laboratory’s database.
For example, if your laboratory previously had 250 participants, the new participant will be
251. LDMS will automatically open the record for the newly created
participant so that you can add enrollment information.