A new storage container is added to an existing level or sub-level.
Before you begin
You must have created the storage units and levels for the container before adding the container.
In other words, you cannot add a container to a freezer without a level, nor can you create a container that is not within a freezer.
Procedure
Click Storage > Stored Specimens from the LDMS menu bar.
Find the storage unit to which you are adding a level.
If you want to add a sub-level to an existing level, find that level instead.
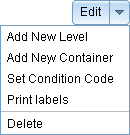
Click the down arrow next to the Edit button to the right of the
level that will hold the container, and then click Add New
Container.
Figure: The Edit level button
If the level has had sub-levels added, the Add new
container option will not be available. A container cannot be added side-by-side with a sub-level.
The Create container window will open.
Enter the number of new containers to add in the Number to
add box.
Optional: Select a template to use from the From template
box.
The information from the template will be populated into the remaining boxes. You
can still modify this information, if needed. Any changes made will only affect the
containers that you are creating.
Enter the number of rows and columns for the new container into the
Number of rows and Number of
columns boxes.
This represents the size and capacity of the new container in terms of the
number of specimens that the container can hold. For example, if you are
creating a box that can hold 25 specimens, you might have
5 columns and 5 rows.
Note: The system will warn the user when a box is outside the max 26x26
dimensions.
Select or deselect the Positions only option as
desired.
If the positions only option is selected, each specimen in the container will be identified by a number. If it is not selected, each
specimen will be identified by its coordinates.
(If Positions only is not selected) Define how specimens
in the new container should be identified.
Select either Row/Column or
Column/Row from the Coordinate
order box.
If Row/Column is selected, each specimen’s
position will be identified in the format (row,column)
Select how columns and rows are to be labeled from the
Column labeling and Row
labeling boxes.
To use letters to identify rows or columns, select
Alphabetic; to use numbers, select
numeric.
Select the fill order for the new level from the
Fill order box.
Fill order will be used when adding new specimens to the container, and you chose to use automatic positioning. While
you must specify a fill order, using the automatic positioning feature
is optional.
Optional: Select a position(s) in the container to be excluded from
the Excluded positions box.
Excluded positions are used to help identify the orientation of the
container (meaning which side is the front and which is the
back).
Optional: To save the current configuration as a new template, do the following.
Select Save As New Template.
In the New Template Name box, enter a name for the template.
Click the Continue button.
The Select position window will open.
Enter a descriptive name for the first container into the
Name box.
This is the label for the new container as it will appear in the
storage tree.
Specify the position for the new container on its parent level by doing one of the following:
Select a position for the new container from the
Position box.
Click on a position in the Preview
section.
Positions that cannot be selected are either already occupied by another container or empty by exclusion rules for the parent level. Gray positions are occupied; black positions are
excluded.
Click the Continue button.
You will need to specify the Name and position for each
new container that you are creating.
Results
The new containers will be created in the positions specified.